
When it comes to creating captivating artwork, few subjects are as iconic and engaging as the cowboy. Rooted in the rich history of the American West, cowboys have charmed us with their rugged appeal and air of adventure for generations. If you’ve ever longed to learn to draw a cowboy, now is your chance! In this easy cowboy drawing guide, I’ll walk you through the entire process, from selecting the right tools to capturing the perfect proportions and poses. Designed for artists of all abilities, this comprehensive cowboy illustration tutorial will have you ready to create your own compelling cowboy drawings in no time. So, grab your pencil and let’s get started!
Table of contents
- Key Takeaways
- Gearing Up: Essential Tools for Drawing a Cowboy
- Starting with the Basics: Understanding Cowboy Proportions
- Outlining the Pose: Action Lines and Dynamic Movement
- Drawing the Cowboy’s Face: Features and Expressions
- The Cowboy Wardrobe: How to Draw Authentic Western Attire
- Bringing Your Cowboy to Life with Shading Techniques
- Adding Background Elements: Setting the Western Scene
- Final Touches: Refining Your Cowboy Drawing
- Conclusion
Key Takeaways
- Understand the rich history and allure of cowboy art
- Discover essential tools for mastering cowboy drawing techniques
- Learn the foundations of cowboy figure proportions and the use of action lines
- Develop realistic cowboy facial expressions and iconic Western attire
- Experiment with shading techniques to bring depth and realism to your drawings
- Explore the integration of background elements for a vivid Western scene
- Refine your artwork with final touches for a polished, professional finish
Gearing Up: Essential Tools for Drawing a Cowboy
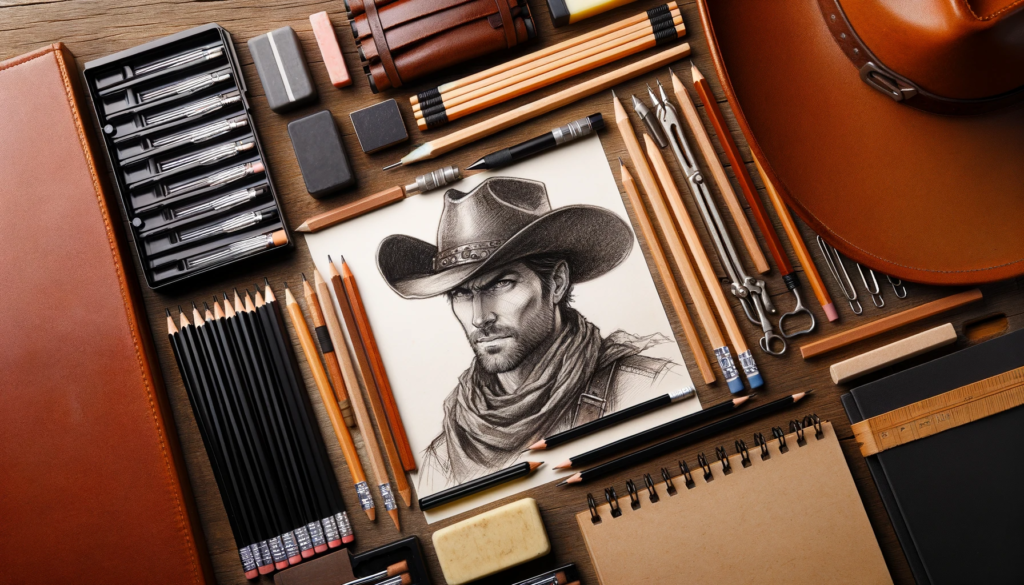
In this section, I’ll discuss the fundamental supplies needed for cowboy sketching. Choosing the right materials and understanding essential drawing techniques is crucial for both beginners and experienced artists. With these tips, you’ll be ready to create captivating cowboy illustrations in no time.
Choosing the Right Paper and Pencils
Different paper textures and weights work best for various drawing applications. For cowboy illustrations, consider using heavier-weight paper with light to moderate tooth texture. This type of surface will allow blended shading and detailed pencil strokes. Popular options include Strathmore Bristol and Canson Mi-Teintes papers.
The right pencil is key to achieving the desired effects in your cowboy drawings. Use a range of pencil grades, from H (harder) to B (softer), each delivering different degrees of darkness and line flexibility. H pencils are ideal for lighter, detailed lines, while B pencils create richer, darker tones.
| Pencil Grade | Usage |
|---|---|
| H | Lighter lines, precision, details |
| B | Richer shading, darker tones, bold strokes |
Understanding the Importance of Sketching Lightly
Sketching lightly is a fundamental skill essential for creating polished cowboy illustrations. Drawing with a lighter touch makes it easier to correct errors and establishes a solid foundation for later, more detailed work. To master this technique, hold your pencil gently and let it glide across the paper’s surface. Maintain a relaxed wrist and apply minimal pressure, gradually building darker lines and shading as needed.
Remember: Start light, build layers, and achieve your desired level of detail and shading as you progress.
Other Drawing Tools to Consider
Equipping yourself with additional tools can enhance your cowboy art. Erasers, blending stumps, and markers are just a few items that can help you achieve greater depth and realism in your drawings.
Recommended additional tools: kneaded erasers, blending stumps, and alcohol-based markers.
- Erasers: Kneaded erasers are moldable and excellent for lifting graphite from the paper without damaging its surface. They can also create highlights or refine details in your artwork.
- Blending Stumps: These cylindrical stumps of compressed paper help blend and smooth pencil strokes, resulting in seamless shading and transitions for enhanced realism.
- Markers: Alcohol-based markers can add vibrant colors or accentuate lines and shading in your cowboy illustrations. These markers provide a smooth application and blend well with various drawing techniques.
With these essential drawing tools and techniques, you’ll be well-prepared to embark on your journey into the world of cowboy sketching. By understanding the importance of choosing the right paper and pencils, mastering the art of sketching lightly, and incorporating additional drawing tools, you’ll be on your way to creating captivating, lifelike cowboy illustrations.
Starting with the Basics: Understanding Cowboy Proportions
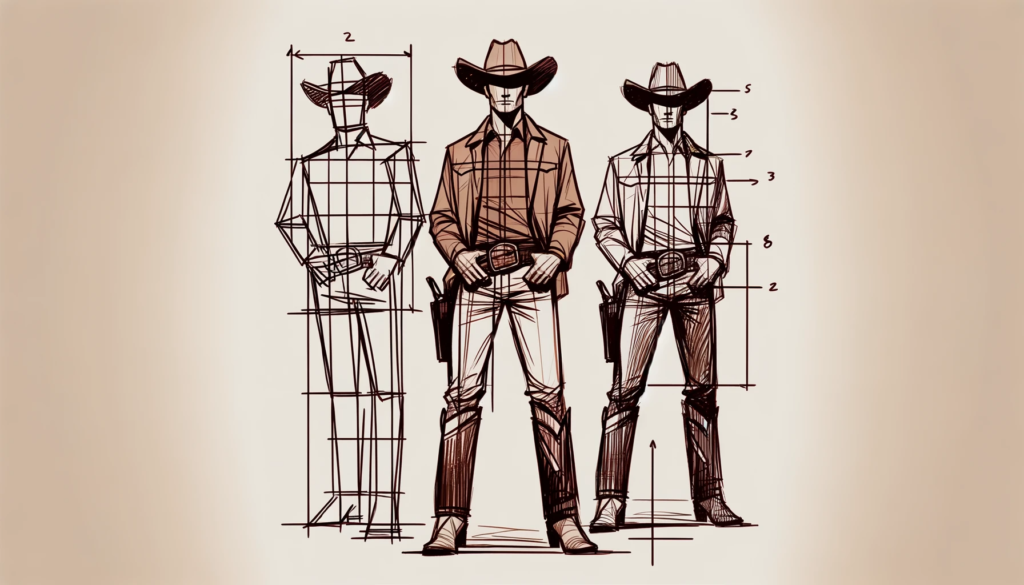
When venturing into the exciting world of cowboy figure drawing, it’s crucial to grasp the cowboy sketching basics and proportions. As a beginner, you might find it challenging to accurately portray the stance and form of a cowboy. By breaking down the form into manageable components, you can create a solid foundation to achieve a realistic and believable representation.
Let’s explore some beginner cowboy drawing techniques to get a deeper understanding of cowboy proportions and structure:
- Start by drawing a vertical line to represent the spine and establish the cowboy’s posture.
- Follow up with a circle on the top to represent the head position and size.
- Identify the position of the shoulders and hips by sketching two horizontal lines.
- Next, draw simplified shapes for the torso, biceps, forearms, thighs, and calves, keeping them proportional to the overall figure.
- Sketch the cowboy’s hands and feet with basic shapes, maintaining the correct size and alignment with the limbs.
- Now, refine the shapes by adding more detail to the muscles, joints, and clothing, without losing sight of the underlying structure and proportions.
It’s essential to maintain an equal balance of proportions throughout the entire drawing process. For example, the distance between the cowboy’s shoulders and hips should roughly be the same as the length of their legs. Searching for reliable references and studying various cowboys’ positions, like standing, sitting on a horse, or leaning against a fence, can greatly enhance your skills.
“The key to achieving accuracy and believability in cowboy figure drawings is mastering proportions and structure” – Frederic Remington, American Western Artist
| Proportion | Description |
|---|---|
| Head | Head’s size influences the scale of the entire figure |
| Shoulders and Hips | Positioning shoulders and hips correctly creates a natural cowboy stance |
| Torso and Limbs | Torso and limb proportions directly affect drawing’s overall dimensions and realism |
| Hands and Feet | Accurate sizing and alignment of hands and feet complement the cowboy figure’s structure |
In conclusion, understanding the basics of cowboy proportions will tremendously enhance your cowboy figure drawing abilities. As a beginner, it is essential to practice regularly, study references, and follow the steps outlined here. Soon, you’ll be able to add more detail and complexity to your cowboy sketches and create captivating, lifelike representations of these iconic figures.
Outlining the Pose: Action Lines and Dynamic Movement
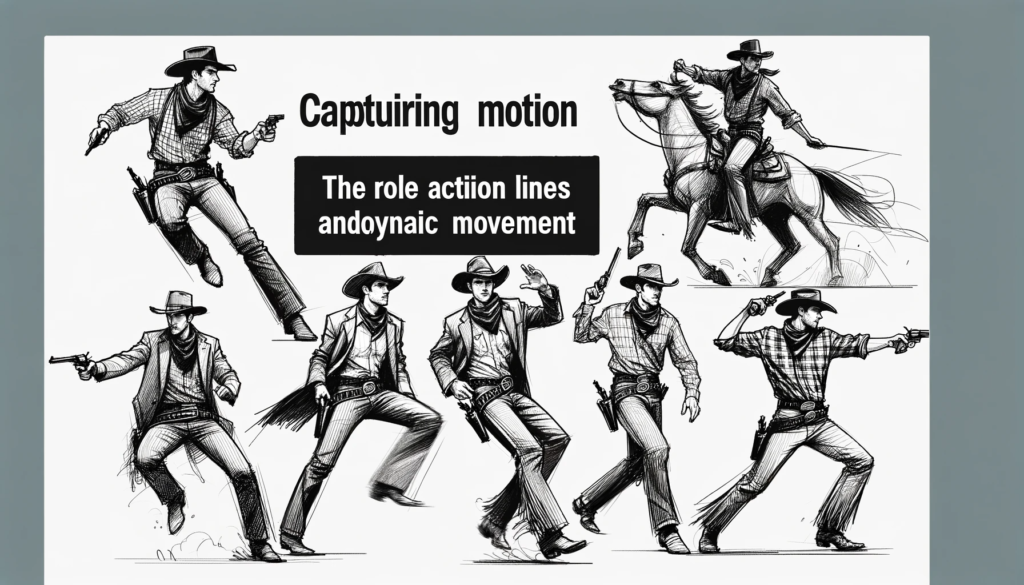
In this section, we will explore how to convey the movement and action typical of cowboy poses through the use of action lines, offering readers a step-by-step approach to creating dynamic and lifelike poses in their cowboy drawings.
Creating a Sense of Motion in Cowboy Poses
Understanding and implementing the posture and gestures that embody the cowboy’s characteristic activities and lifestyle are crucial in achieving a dynamic and realistic pose. Action lines are an essential tool for capturing motion in cowboy sketches. To begin, draw a basic stick figure of the desired pose, using a curved line to represent the spine and extending limbs to capture movement. This simple structure serves as a guideline for positioning body parts and conveying the desired action.
| Activity | Action Line |
|---|---|
| Walking | Slanted line with a slight curve, representing the movement of the hips and shoulders |
| Riding a horse | Wide arc, mimicking the cowboy’s body contour as they lean forward to hold the reins |
| Shooting | S-curve line, illustrating the cowboy’s bending knees, arching back, and extending arms |
Important:
Always ensure that the action lines depict the flow of movement, rather than focusing on precise proportions.
Breaking Down the Cowboy Figure into Shapes
Breaking down the cowboy figure into basic shapes is an excellent way for beginners to start visualizing and constructing their drawings. This sub-section will provide a guide on translating complex cowboy figures into simpler, manageable components. The key is to focus on simple geometric forms like rectangles, circles, and triangles to represent various body parts and the cowboy attire.
- Head: A circle or oval
- Torso: A rectangle or trapezoid
- Arms: Cylinders or slim rectangles
- Hands: Triangular shapes
- Legs: Cylinders or elongated rectangles
- Feet: Rectangles with a triangular viewport, for cowboy boots
“Simplicity is the key to brilliance.” – Bruce Lee
Once the basic shapes are in place, refine and connect them to create a more realistic depiction of the cowboy’s body. Remember to emphasize the action lines and dynamic nature of the pose. As the cowboy drawing progresses, gradually introduce finer details to enhance the illustration’s realism and bring the character to life.
In conclusion, mastering cowboy drawings starts with creating dynamic poses that capture the essence of the cowboy’s character and lifestyle. By implementing action lines and breaking down complex poses into simple shapes, artists of all levels can create compelling, realistic cowboy illustrations that evoke the spirit of the Wild West.
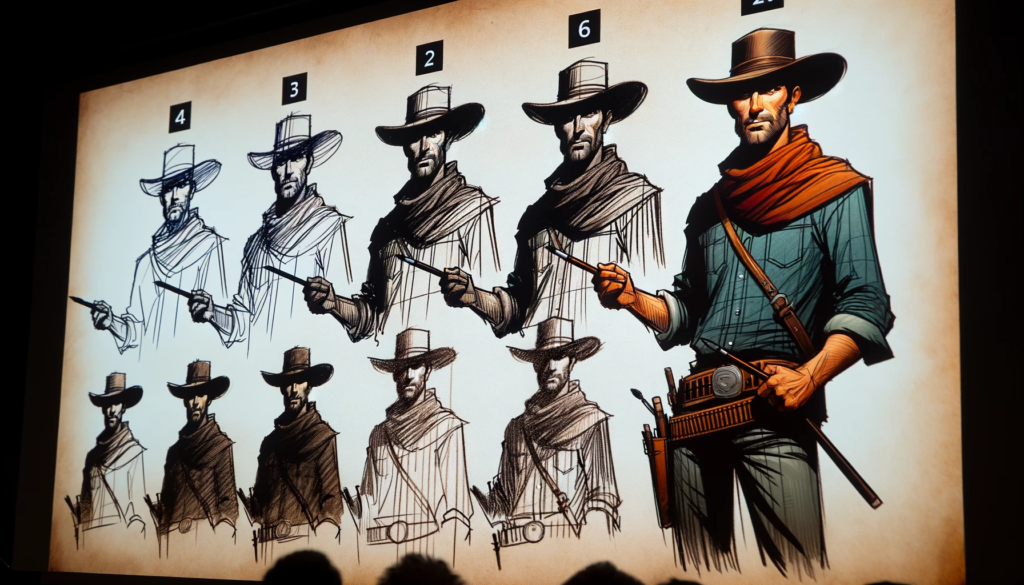
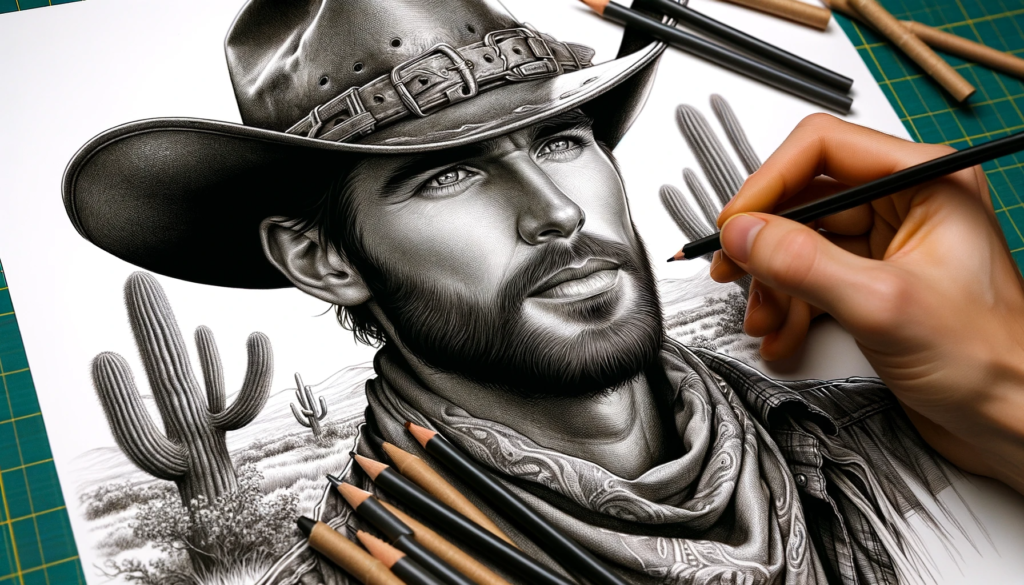
Drawing the Cowboy’s Face: Features and Expressions
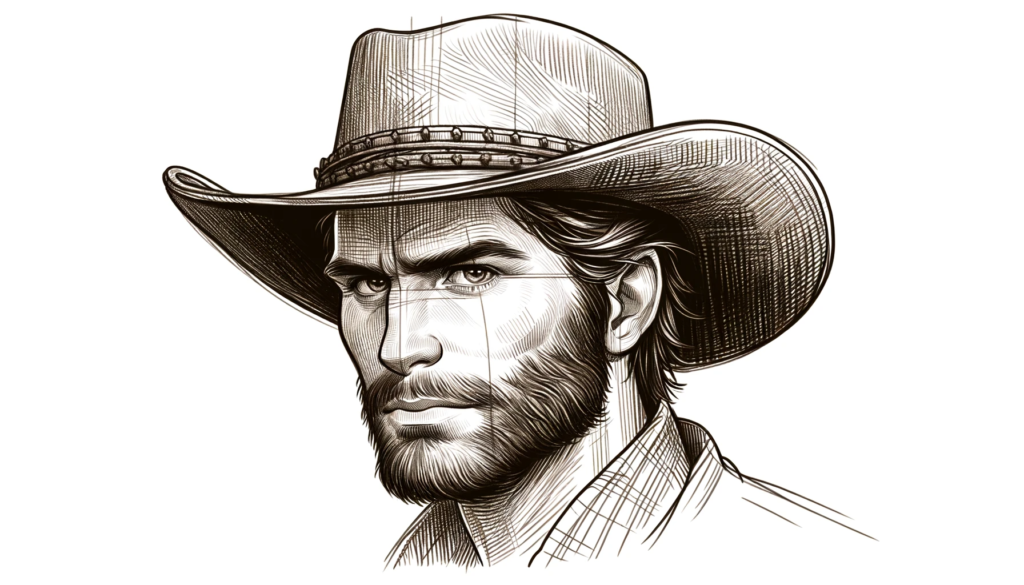
To create a truly captivating cowboy face drawing, it is essential to focus on the rugged features and unique realistic cowboy expressions that set these Western characters apart from others. The distinctive cowboy hat also plays a significant role in crafting an authentic look, casting a characteristic shadow over the eyes. In this section, I will guide you through the process of capturing these crucial elements to bring your cowboy portrait to life.
First, let’s explore the essential facial elements that contribute to a believable cowboy:
- Weathered skin with wrinkles
- Furrowed brow
- Rugged facial hair (beard or mustache, if applicable)
- Squinted or focused eyes
- Firm-set lips
- Distinctive scar or mark (optional for added character)
Next, we’ll delve into drawing a cowboy hat, an indispensable component of the classic cowboy look:
- Start by sketching a basic oval above the eyes to establish the hatband area.
- Draw the brim and upper crown, slightly extending the lines as they contour the oval, ensuring the shape aligns with the perspective in drawing.
- Below the oval, sketch the crown of the hat, making note of its indentation or crease for added detail.
- Enhance the sketch by shading the underside of the brim, as well as the crown’s crease, to establish depth and shadow.
“When drawing a cowboy’s face, it’s important to master the balance between rough features and subtle expressions, capturing the essence of the cowboy’s resilient spirit.”
Once the facial features and hat have been established, it’s time to focus on conveying the realistic cowboy expressions.
| Expression | Key Points |
|---|---|
| Determination | Emphasize the furrowed brow, focused eyes, and slightly tense jaw. |
| Weariness | Augment wrinkles, drooping eyes, and a hint of sagging facial muscles. |
| Observation | Accentuate the squinted eyes, convey a slight frown, and combine with an upright posture. |
| Confidence | Execute a hint of a smile, determined eyes, and a firm yet relaxed brow. |
By understanding the subtleties of realistic cowboy expressions and honing your skills in drawing the distinct facial features and iconic cowboy hat, you will be well on your way to mastering the art of cowboy face drawing. Remember, practice makes perfect, so keep refining your techniques to achieve the most authentic and captivating illustrations.
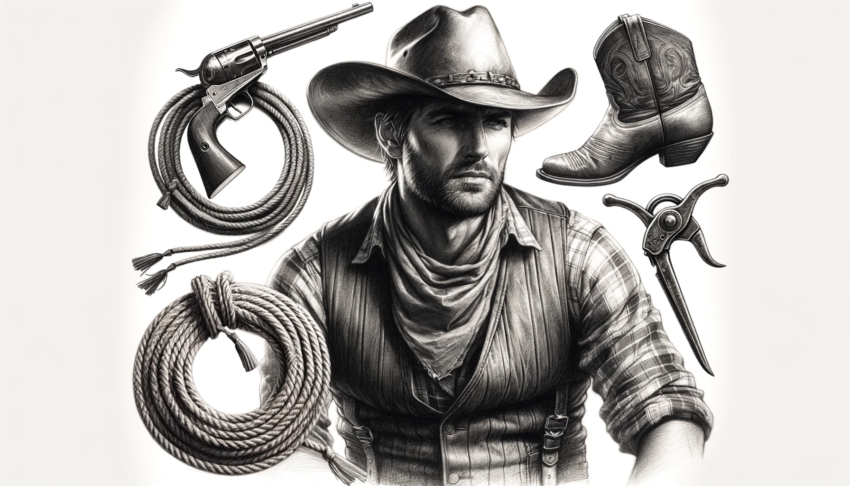
The Cowboy Wardrobe: How to Draw Authentic Western Attire
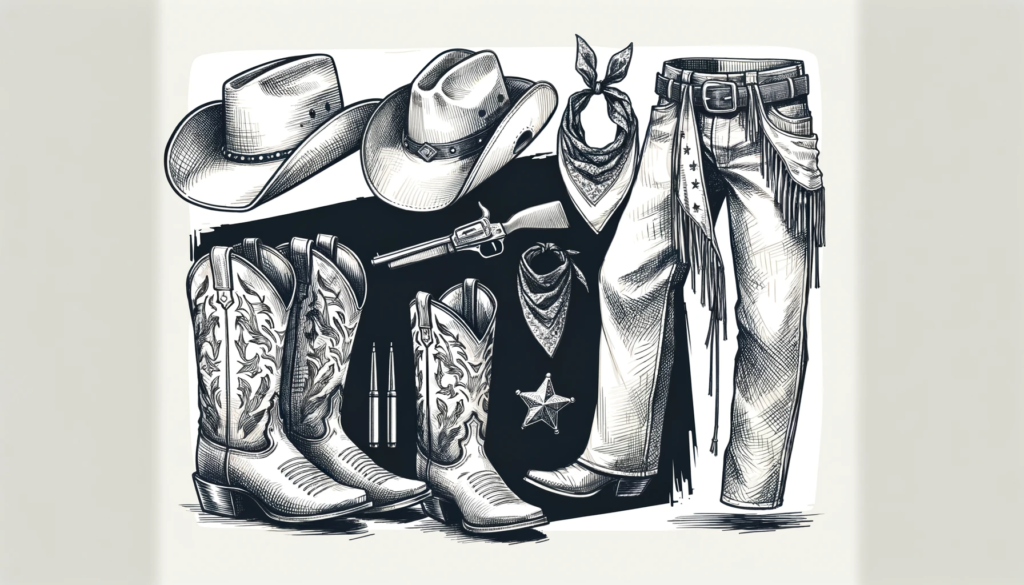
In this section, I’ll detail the elements of a typical cowboy wardrobe, providing insights into drawing clothing with realism and how to impart a sense of texture and weight to the various garments and accessories characteristic of Western wear.
Drawing the Iconic Cowboy Hat
The cowboy hat is emblematic of Western style, and I’ll offer step-by-step instructions to drawing this crucial element with accuracy. To begin, draw an oval shape for the crown of the hat and then add a brim around it, shaped like an ellipse. Sketch the contours of the hatband and the creases in the crown for a more realistic look. To achieve the right texture and depth, pay attention to the shading and highlights, considering the direction of the light source.
Note: When drawing the brim, keep in mind that it will have a curve, rising at the sides and dipping down at the front and back to give the hat its signature shape.
Sketching the Cowboy’s Shirt, Vest, and Chaps
I’ll discuss the nuances of drawing the various pieces of the cowboy’s attire, from shirts and vests to the protective chaps. When drawing the cowboy shirt, consider the fabric’s fold and drape, paying close attention to the collar, sleeves, and overall fit.
For vests or waistcoats, focus on showing pockets, buttons, and lapels. Alternatively, to how to draw cowboy chaps, remember that chaps are worn over jeans, so make sure to illustrate the belt loop, fastenings, and fringed edges.
- Start by outlining the basic shape of each clothing item.
- Add the details such as seams, buttons, and pockets.
- Focus on the fabric’s texture and folds to add depth and realism.
- Shade and highlight the garments, taking into account the light source.
Adding Details to the Cowboy’s Boots and Accessories
Attention to detail brings artwork to life. I’ll guide readers through the intricacies of adding realistic details to cowboy boots and accessories like belts, buckles, and bandanas to give drawings character and authenticity.
| Accessory | Drawing Tips |
|---|---|
| Cowboy Boots | Begin with a basic boot outline, add the distinctive stacked heel, pointed toe, and ornate stitching patterns. Don’t forget the cowboy boots drawing tutorial for helpful guidance on achieving the right proportions. |
| Belts and Buckles | When drawing belts, show the buckle’s shape and design, belt loops, and the strap’s thickness. Focus on metallic shading for buckles to create a sense of depth and dimension. |
| Bandanas | Sketch the bandana’s basic triangular shape and then emphasize the folds and wrinkles as it wraps around the cowboy’s neck. Add patterns and shading to convey the fabric’s texture. |
| Other Western Gear | Consider incorporating other elements like holsters, guns, lassos, and spurs, depending on the cowboy’s activities. Follow western gear illustration tutorials to ensure accurate and detailed representations. |
By understanding the various elements of a cowboy’s wardrobe, focusing on texture, and mastering the use of shading and highlights, you’re well-equipped to create compelling and authentic cowboy drawings that showcase the essence of Western style.
Bringing Your Cowboy to Life with Shading Techniques
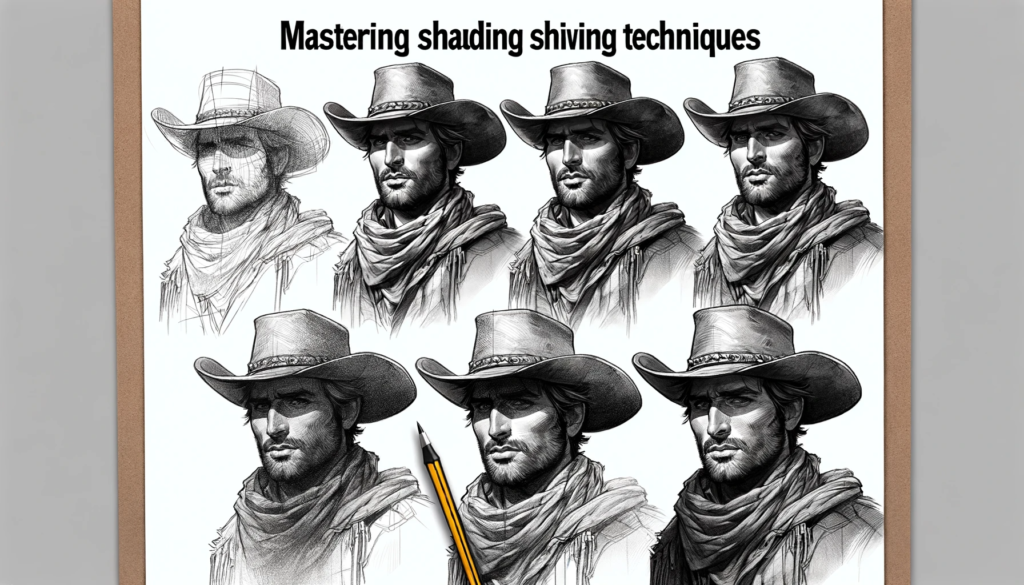
Shading is pivotal in adding dimension to artwork. In this section, we will explore how to utilize light and shadow to bring a sense of depth and realism to your cowboy drawings. By mastering cowboy shading techniques, you will ensure that each cowboy appears three-dimensional and grounded in their environment.
Understanding Light Sources for Realistic Shading
Identifying light sources and their impact on shading is crucial for achieving a believable sense of form in cowboy illustrations. Begin by examining the direction in which light is coming from in your drawing. This will determine the areas that are darkened by shadow and those illuminated by highlights. Furthermore, keep in mind that the strength and distance of the light sources will also affect the intensity of the shadows and highlights.
Pro Tip: To practice working with different light sources, try sketching the same cowboy scene with light coming from various angles. This will expose you to a wide variety of shading in cowboy drawing scenarios.
Creating Depth with Shadows and Highlights
Through shadows and highlights, drawings come to life. Shadowing cowboy illustrations and utilizing highlights helps enhance the overall depth and dimension in your cowboy artworks. Consider the shape and volume of the cowboy figure and attire as you begin applying shades and highlights to your drawing.
- Shadows: Determine where shadows should be cast based on your chosen light sources, and study the way shadows wrap around the form of the cowboy and his outfit. This will create the illusion of depth, emphasizing any folds or creases in clothing and facial features.
- Highlights: Identify the areas where light would hit your cowboy’s form, like the cheekbones, forehead, and top of the hat. Add highlights to these areas to emphasize contrast, making your cowboy stand out in a realistic cowboy illustration.
Creating a balance of light and shadow in your drawings is essential for capturing the essence of western art shading. As you practice, you’ll become more adept at identifying and adjusting light sources and using shading to bring your cowboys to life.
| Shading Technique | Description | Effect |
|---|---|---|
| Hatching | Drawing closely spaced parallel lines | Gradual change in value, creating texture |
| Cross-hatching | Drawing overlapping sets of parallel lines at different angles | Deeper shadows and a more textured appearance |
| Stippling | Creating shading using small dots | Smooth shadows and gradual changes in value |
| Smudging | Blending graphite or charcoal with a tool or finger | Soft and smooth shadows, creating a sense of depth |
Experiment with various shading techniques to find the ones that best suit your style and add character to your cowboy illustration lighting. Remember, practice makes perfect, and as you continue to develop your shading skills, your cowboy drawings will become more and more lifelike.
Adding Background Elements: Setting the Western Scene
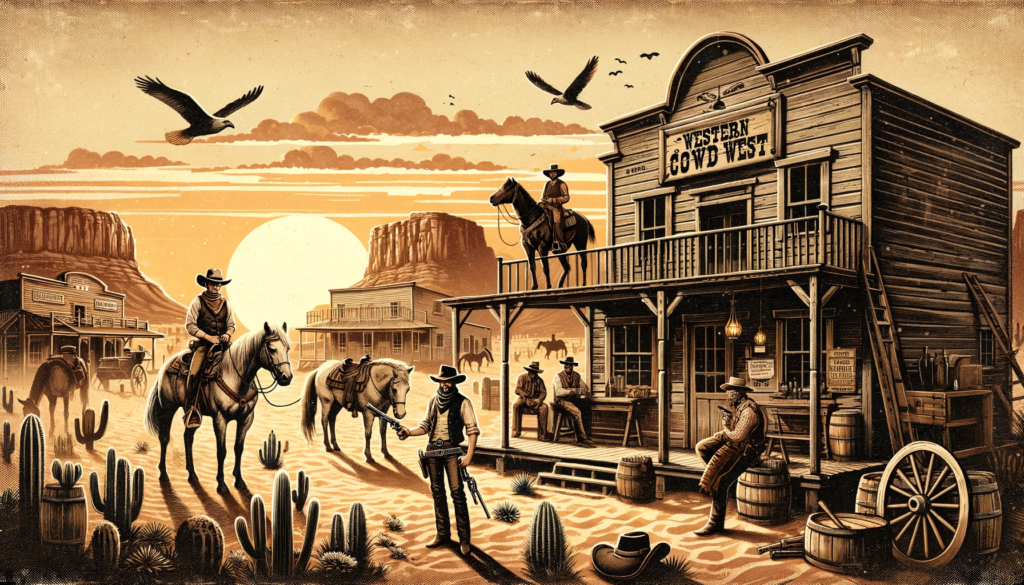
A compelling background sets the stage and context for any cowboy illustration. To establish a vivid Western scene that complements the cowboy subject, various elements like saloons, horses, and desert landscapes can be integrated. This section will discuss how to create the perfect backdrop to enhance your cowboy drawing.
Start by considering the setting you want your cowboy character to inhabit. Think about popular elements found in Western movies, novels, and historical accounts, such as dusty main streets, saloons, and playful fauna. The setting you choose will help set the tone and narrative for your work.
| Background Element | Description |
|---|---|
| Desert Landscape | Rugged terrains, cacti, and scorching sunsets create a captivating environment for your cowboy drawing. |
| Saloons | Include buildings with swinging doors, wooden signs, and lively crowds for a bustling atmosphere. |
| Horses | Adding a trusty steed, whether standing still or thundering across the landscape, will make your cowboy appear more dynamic. |
| Wildlife | Incorporate animals such as snakes, vultures, and coyotes to emphasize the harsh realities of life in the Wild West. |
To begin illustrating your background, start with simple shapes and lines that define the larger elements of the scene. Remember to keep the cowboy as the focal point, ensuring that the background does not overwhelm the main subject in the composition.
Lighting plays a crucial role in setting the mood of your western scene illustration. Consider the time of day and weather conditions, using appropriate shading techniques to create a cohesive atmosphere that brings all elements together.
Don’t be afraid to experiment with different angles and perspectives when constructing your cowboy drawing background – this adds depth and dimension to your cowboy art context.
Attention to detail is essential in creating dynamic and immersive backgrounds. Consider incorporating small elements such as wagon wheels, tumbleweeds, or wanted posters to add texture and character to the scene. This level of detail further enhances the cowboy art context and solidifies the narrative of your illustration.
- Sketch basic shapes and lines for larger background elements.
- Consider the time of day and weather conditions for appropriate lighting and mood.
- Add details like wagon wheels or wanted posters for added depth and character.
By integrating various elements, you can create a vivid and captivating Western scene that enhances your cowboy drawing. With practice, you’ll master the art of setting the perfect stage for your cowboy character, bringing vibrant life to your illustrations.
Final Touches: Refining Your Cowboy Drawing
No drawing is complete without the final touches. This section will highlight the critical steps of evaluating a piece for balance and cohesiveness, as well as the cleanup process, to ensure that the final cowboy drawing is polished and professional.
Evaluating Your Drawing for Balance and Composition
One of the essential aspects of refining cowboy drawings is their balance and composition. A well-balanced drawing can make or break the viewer’s experience and engagement with the artwork. To achieve this harmony, consider the following points:
- Distribution of visual weight: Ensure that the elements in your drawing are distributed evenly, without overly focusing on a particular area, to avoid visual discomfort.
- Consistency in style: Your drawing elements, including line work, shading, and textures, should have a consistent style throughout the piece.
- Focal points: Look for areas in your drawing that naturally draw the eye and make sure they are not competing or causing confusion for the viewer.
Remember to step back from your drawing and view it from a distance. This perspective change can help identify any imbalances or inconsistencies, giving you a better insight into your cowboy illustration’s overall composition and balance.
Erasing Guidelines and Cleaning Up Your Sketch
Cowboy sketch finalization involves the important step of erasing drawing guidelines without damaging the artwork. Carefully remove any visible guidelines or marks that distract from the primary lines of your drawing. Here are some tips for effectively cleaning up your sketch:
- Use a soft eraser to minimize the risk of damaging the paper or smudging your drawing. The art of erasing lines without affecting the final image is a skill in itself.
- For small, detailed areas, utilize a kneaded eraser, which is gentle on the paper and can be molded to erase precise zones in your artwork.
- After erasing your guidelines, you may notice some of your lines have become faint. Go back and strengthen the lines that need attention to make your drawing pop.
Keep practicing these techniques, and soon you’ll master the art of cowboy illustration finishing.
The final step of your cowboy art finishing process is to evaluate the overall clarity and presentation of your drawing. Ensure that your drawing is free of smudges and dust by using a soft brush or gentle air blower to remove any remaining eraser particles or debris from the surface of your artwork.
| Technique | Benefits |
|---|---|
| Distribution of visual weight | Creates a well-balanced composition, enhancing viewer engagement |
| Consistency in style | Helps maintain a cohesive appearance throughout the drawing |
| Focal points | Enhances the impact and intention of your drawing by directing the viewer’s attention |
| Erasing guidelines | Improves the final presentation and professionalism of the artwork |
| Cleaning up the sketch | Results in a pristine final product, ready for display or digitization |
By carefully evaluating your drawing for balance and composition, erasing guidelines, and cleaning up your sketch, you’ll effectively refine your cowboy drawings, ensuring a polished and professional final piece that is ready for display or digitization.
Conclusion
In this comprehensive guide to cowboy artwork tutorials, we’ve covered essential techniques and tips to help you succeed in drawing a captivating cowboy illustration. From understanding proportions and poses to capturing expressions, attire, and shading, our aim was to provide you with a solid foundation upon which to build your skills. As a recap, we have discussed the importance of sketching lightly, selecting the right art tools, creating dynamic poses through action lines, and mastering shading and highlighting to bring your cowboy drawing to life.
As with any artistic pursuit, practice is key in achieving the level of mastery you desire. Draw inspiration from cowboy illustrations and history, experiment with different styles and techniques, and always be open to learning and refining your skills. Embrace challenges and remember to have fun while you draw, as it is the passion for creating that will truly take your artwork to new heights.
Finally, I would like to encourage you to share your progress and discoveries with fellow artists and enthusiasts. The community of cowboy art lovers is vast and diverse, and you will find no shortage of support, feedback, and ideas to further fuel your journey. Keep pushing yourself and remember the thrill of accomplishment each time you complete a new, more fantastic cowboy illustration. Happy drawing!
FAQ
What are the essential drawing tools needed for cowboy sketching?
The fundamental supplies needed for cowboy sketching include a range of paper types and pencil grades to suit the artist’s style and project. Additional tools such as erasers, blending stumps, and markers can also be beneficial for achieving greater depth and realism.
How can I ensure realistic proportions when drawing a cowboy figure?
Start with understanding and mastering the basic structure and fundamentals of human anatomy. This will serve as a foundation for achieving an accurate and believable cowboy form in your artwork.
What techniques can I use to create a sense of motion in cowboy poses?
To convey movement and action in cowboy poses, use action lines and focus on the posture and gestures that embody the cowboy’s characteristic activities and lifestyle. Breaking the cowboy figure down into simpler shapes can also help visualize and construct dynamic poses in your drawings.
How do I capture the rugged features and typical expressions of a cowboy?
Focus on the details such as facial hair, weathered skin, and the iconic hat that often casts a characteristic shadow over the eyes. Study reference images and practice rendering these features to achieve a realistic cowboy face and expression.
What are some tips for drawing authentic western attire and accessories?
Understand how fabric drapes and folds, convey the unique textures found in Western clothing, and pay attention to realistic details when drawing elements such as cowboy hats, boots, belts, buckles, and bandanas. This will give your drawings character and authenticity.
How can shading techniques help bring my cowboy drawing to life?
Utilize light and shadow to create a sense of depth and realism in your cowboy drawings, making them appear three-dimensional and grounded in their environment. Understand the impact of light sources and apply techniques for creating shadows and highlights to enhance the overall depth and dimension in your artwork.
What elements can I integrate into the background of my cowboy drawing to create a vivid western scene?
Consider adding elements like saloons, horses, desert landscapes, or other items relevant to the cowboy’s environment, to establish a vivid western scene that complements the cowboy subject.
How do I refine and finalize my cowboy drawing?
Evaluate your drawing for balance, composition, and cohesiveness. Then, erase guidelines and clean up the sketch using proper techniques to achieve a polished and professional final product that’s ready for display or digitization.